

You spent weeks building your course. You recorded the lessons, wrote the copy, set up payments. And then you launched — and the people who found you… left. Not because the course was bad, but because the homepage didn’t give them a reason to stay.
That is the real job of your course website homepage: not to impress, but to make the right person feel immediately that this is for me. It has about five seconds to do it. This article walks you through the design decisions that determine whether those five seconds turn into an enrolment — section by section, with the common mistakes included.
If you’re after the structural blueprint (which blocks go where in the page layout), head to our sibling piece on homepage layout for courses. This article takes the complementary angle: the visual and design principles behind each section — what makes the hero actually work, why social proof placement matters, how to build trust with someone who’s never heard of you before.
What a course website homepage needs to do (before we talk design)
Before picking colours or fussing over fonts, it’s worth being honest about what the homepage has to achieve. It needs to do four things, and the design choices flow from those four things:
- Name the offer clearly. A visitor should be able to say — within a few seconds, without clicking anything — “this is a website where I can learn X.” Vague or aspirational language (“unlock your potential”) fails this test. The test is simple: can someone who doesn’t know you describe what you do after five seconds on the homepage? If not, the headline needs work.
- Show it’s for someone like them. This is where specificity earns its keep. “For coaches who want to sell their first online course” lands differently than “for anyone who wants to teach online.” The more precisely the page speaks to one person’s situation, the better it works for the people who fit that situation — and the more confidently it filters out visitors who were never going to enrol anyway.
- Give them one thing to do. Not a newsletter signup and an explore-courses button and a free trial and a pricing link all competing on the hero. One primary action per page section. When you offer three options at once, visitors take the easiest one: they leave.
- Make a credibility case fast. Someone who doesn’t know you will look for signs that real people have trusted you before. Testimonials, student counts, and visible course previews do this work. The longer they have to scroll before finding any of these signals, the more likely they are to leave before finding them.
The design choices below all serve one of those four jobs. If a design element doesn’t, it’s decoration at best.
The hero section: clarity over cleverness
The hero — the portion of the page visible before anyone scrolls — is where most course websites go wrong, and it’s almost always the same mistake: a beautiful image paired with a headline that could belong to any website in any industry.
A good course website hero has three elements working together:
A plain-language headline that names the transformation. Not “Build your future today” but something like “Learn to price your consultancy services — and stop undercharging.” The more specific the result, the more the right person recognises themselves in it. Keep it to one sentence. If you find yourself wanting two sentences, the second one is probably a sub-headline.
A sub-headline that adds the who and the how. If the headline covers the destination, the sub-headline covers the vehicle: “A six-week programme for independent consultants, with live Q&A each week.” This is where you earn trust with specificity. The format (live vs. self-paced), the time commitment, the level (beginner vs. advanced) — one of these usually belongs here.
One call to action. One button. Either “start for free” or “enrol now” or “see the full programme” — whichever matches where this visitor is in the decision journey. Resist the urge to offer two options here; it splits attention and reduces clicks on both. If you genuinely need a secondary option (“or book a call instead”), make it visually quieter — a text link, not a second button.
What about the image behind the hero? It should feel relevant without being literal. A person at a laptop is fine; a generic stock-photo classroom is not. Clean, warm, and uncluttered works well — the words are doing the heavy lifting. The image should be background support, not the centrepiece.
Social proof: put it where doubt lives
Most course websites add a testimonials section somewhere near the bottom, where visitors land after they’ve already decided to leave. The more effective move is to place proof right where doubt first appears — which is usually right below the hero.
A simple “proof bar” works well: three or four data points in a horizontal strip. “Joined by 2,400 students” works. A single sentence from a real student with their name and job title works. Logos of organisations your students work at, or media features, work for established courses. The bar doesn’t need to be elaborate — it just needs to say, at a glance, that you’re not the only person who thinks this is worth doing.
The testimonials themselves — the longer ones — earn their place lower on the page, just before the final call to action. At that point the visitor is interested but not yet committed, and a real student story tipping them over the line is exactly what’s needed.
One thing that doesn’t work: three generic five-star quotes from “Sarah M.” with no context, no photo, no specifics. Those read as invented even when they’re real. Concrete details — “I landed my first paying client within three weeks of finishing the course” — carry weight. “Great course, highly recommend!” does not. If you only have vague testimonials right now, ask your recent students a specific question: “What were you able to do differently after finishing, that you couldn’t do before?” The answers are almost always usable.
Section by section: the structure that works for most courses
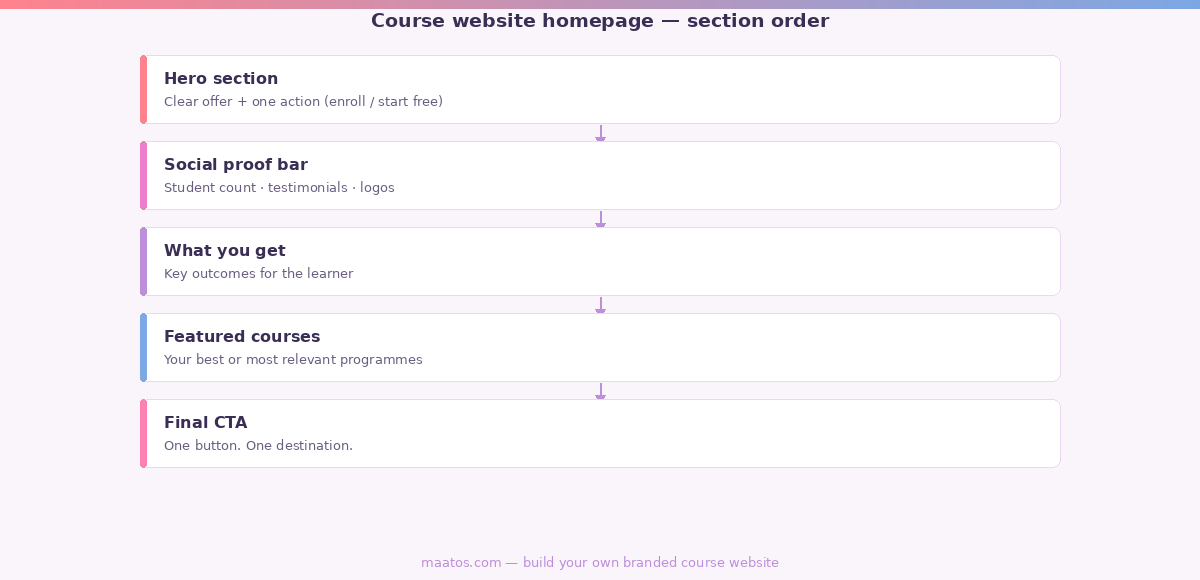
There is a rough order that most successful course homepages follow, and the reason it works is because it mirrors the visitor’s mental journey from curious to confident:
- Hero — name the offer and the primary action
- Proof bar — quick credibility signal before they scroll further
- What you get / outcomes — the specific results a student can expect
- Featured courses or programmes — your best offerings, briefly
- Final CTA — one warm invitation to take the next step
Longer homepages for multi-course platforms or academies often add an “About the instructor” section and a short FAQ between the featured courses and the final CTA. Both earn their place by reducing hesitation for people who are interested but not yet certain. A brief instructor bio — one or two sentences, a real photo, one relevant credential — humanises the offer at exactly the moment someone is asking “but who actually teaches this?”
The layout counterpart to this — how to decide the proportions, widths, and column structures for each of these sections — is covered in detail in our homepage layout guide. This article focuses on what goes inside each section and why, not the grid.
Visual design principles that apply specifically to course homepages
Colour, typography, and whitespace are not styling choices you make after everything else is decided. They’re the tools through which the page communicates before the visitor has read a word.
Colour signals trust — or undermines it. Course websites tend to underperform when they use colours that feel out of step with what they’re teaching. A mindfulness or yoga course with an aggressive red palette creates a subconscious mismatch. A business or finance course with pastel pinks might feel too casual for an audience that takes ROI seriously. Start from what your students expect from your subject area, then make deliberate choices to stand out within that range — not to escape it entirely. The goal is distinctive-within-familiar, not jarring.
Whitespace is not wasted space. The instinct to fill every pixel — course descriptions, social media icons, newsletter opt-ins, a blog preview — makes a homepage feel busy in a way that communicates chaos rather than confidence. Breathing room around your headline and CTA actually draws more attention to them. Less on the page means what’s there carries more weight. A homepage with generous whitespace feels like a brand that has earned the right to be calm; a crowded one feels like it’s trying too hard.
Typography hierarchy does the scanning for your visitor. People don’t read homepages; they scan. A clear hierarchy — large headline, medium sub-headline, smaller body text — lets someone understand the gist without reading anything carefully. When every element is the same visual weight, nothing registers. A good test: blur your screen slightly and see whether your eye still goes immediately to the headline. If it doesn’t, the hierarchy isn’t working.
Images should support the words, not replace them. A homepage image that has no meaningful relationship to the course content is worse than no image, because it takes up the space that trust signals could occupy. An instructor photo, a screenshot of the course interface, a student working through the material — any of these is more valuable than a generic conceptual illustration. Real beats generic every time.
For deeper visual design principles — contrast, scale, gestalt, and how they interact across a whole course website — the visual design basics guide covers the theory in full. What matters most on the homepage specifically is that these principles serve the four goals from the opening section: clarity of offer, relevance to the visitor, a single clear action, and fast credibility.
Designing for a training institute or online academy
Searches like “homepage structure for IT training institute” or “best homepage for an online academy” come from a slightly different context — not a solo creator launching one course, but an organisation (a company’s training arm, a professional academy, a school with a catalogue of programmes) that needs its homepage to serve multiple audiences or multiple programmes at once.
The design challenge here is different, and the most common mistake is trying to solve it by adding more to the page. More courses listed, more bullet points about why the institute is trustworthy, more logos, more links to departments. It usually makes things worse.
What actually helps for multi-programme homepages:
Choose a primary audience and speak to them first. Even if your institute serves five different audiences, lead with the one that represents the most business or the one with the strongest need. You can address the others lower on the page or in the navigation. A homepage that tries to greet everyone simultaneously tends to greet no one.
Use the hero to communicate the category, not a specific course. “Professional training for IT teams” or “Online courses for finance professionals” establishes the territory immediately. The specific programmes come below, once visitors have confirmed they’re in the right place.
Build credibility at the institutional level. For a training institute, social proof looks slightly different: accreditation badges, partnership logos, aggregate student numbers (“over 12,000 professionals trained”), or employer names. These signals carry the weight that individual testimonials carry for a solo instructor. Where possible, both — an institutional number plus one real person’s story — works best.
Keep the primary CTA institutional. “Explore our programmes” or “Talk to our team” is often more appropriate than “Enrol now” for institutes where the buying decision involves a manager or an HR department. Match the CTA to how decisions actually get made in your sector. Forcing an individual enrolment flow on a B2B audience creates friction at exactly the wrong moment.
The visual design principles stay the same — clarity, hierarchy, whitespace, trust signals — but the specific choices shift to match an organisational context rather than a personal one. A Maatos-built site handles both well, since the platform lets you build a fully branded environment with a catalogue of courses without any of the technical overhead. The right supporting pages matter too — our guide to essential pages for a course website covers what else belongs in the site structure around the homepage.
The mistakes that most course homepages make
It’s worth naming these explicitly because they come up so often, and because they tend to compound each other:
Vague headline plus a hero image that doesn’t relate to the topic. The page looks polished but says nothing. Visitors leave because they can’t immediately place themselves in what’s being offered. “Welcome to our learning platform” is not a headline.
Too many calls to action. Sign up to the newsletter, book a free call, explore courses, download the free guide — all on the first scroll. The result is that visitors don’t take any of them. Pick one. You can add secondary options lower on the page once someone has decided they’re interested.
Testimonials with no specifics. Generic praise without context (“It changed my life!”) reads as meaningless to a sceptical visitor. One specific outcome from one real student beats five vague star ratings. If testimonials are hard to get, ask three recent students the same specific question and use the best answer.
Navigation designed for you, not the visitor. Menus that reflect your internal organisation (“Module 1”, “Resources”, “Admin area”) rather than the visitor’s questions (“Which course is right for me?”, “What does it cost?”, “Who is this for?”). Navigation on the homepage should answer the questions someone has before they’ve decided anything.
A homepage that reads like a brochure about the instructor, not a conversation with the student. “We have been providing quality education since 2018” positions the reader as audience to a corporate announcement. “You’re in the right place if you want to…” puts them in the story. The whole homepage should be written from the visitor’s perspective, not the creator’s.
Ignoring mobile. A homepage that looks beautiful on a 27-inch monitor and unreadable on a phone is a homepage that fails most of its visitors. Test the hero section on your own phone before you publish — specifically the headline size, the button tap target, and whether the proof bar wraps into an unreadable mess on a small screen.
What about landing pages — are they different from the homepage?
Sometimes, yes. The homepage of a course website and a dedicated course landing page have different jobs, and confusing them is a common source of underperformance.
The homepage serves visitors who are still deciding whether this platform or instructor is worth their attention. It needs to establish credibility and show range, then funnel visitors toward their specific interest. Navigation is present. Multiple courses may be mentioned. The tone is exploratory.
A course landing page serves visitors who’ve already decided they’re interested in a topic — they’re just deciding whether your version of that topic is worth their money. Landing pages strip away navigation, focus on one course, and are conversion-optimised to the exclusion of almost everything else. Every element on the page is asking: does this help someone decide to enrol?
If you’re building a single-course website, the homepage often is the landing page, and the principles merge. If you have multiple programmes, they’re separate pages with different jobs. Our guide to creating high-converting course landing pages covers the specific elements that work for that second context in detail.
Frequently asked questions about course website homepage design
How many sections should a course website homepage have?
Five to seven is a reasonable range for most course websites. The core five — hero, proof bar, outcomes, featured courses, CTA — cover the basics. Add an instructor section and an FAQ if your audience needs extra convincing before they act. Beyond seven sections, you risk overwhelming visitors with information they didn’t ask for. More sections don’t equal more trust; specificity does. If you find yourself adding an eighth or ninth section, ask which one is doing the least work and remove it.
Should the homepage show every course I offer?
No. Showing everything tends to produce a catalogue that visitors browse passively rather than a focused page that moves them toward a decision. Feature your two or three strongest programmes with brief descriptions, then link to a full courses page for the rest. Scarcity of choice on the homepage is usually a conversion advantage, not a disadvantage — people move faster when there are fewer decisions to make.
What’s the difference between a homepage and a course landing page?
The homepage serves new visitors who don’t yet know if they’re in the right place — it needs to establish credibility and show range. A course landing page serves someone who’s already interested in a specific topic and is deciding whether to buy. Landing pages remove navigation and concentrate everything on one enrolment decision. If you have one course, your homepage and landing page are probably the same thing. With multiple courses, they’re separate pages with different jobs.
How do I design a homepage for a training institute with multiple programmes?
Lead with your primary audience in the hero, even if the institute serves several. Use the headline to establish the category (“Professional training for healthcare teams”) rather than a specific course. Build credibility with institutional signals — accreditations, employer partnerships, aggregate student counts — rather than individual testimonials alone. Keep the primary CTA institutional: “Explore all programmes” rather than “Enrol now.” Specific courses come below the fold, once the visitor has confirmed they’re in the right place.
What goes in the hero section of a course website?
Three things: a specific headline naming the transformation or outcome your student gets, a sub-headline adding the who (who this is for) and the how (format, duration), and a single call-to-action button. The image behind or beside these elements should feel relevant to your topic and warm without being clichéd. Everything else is optional and usually distracting. When in doubt, take something out of the hero rather than adding to it.
How often should I update the homepage design?
The copy and proof should update whenever the reality changes — new student numbers, new testimonials, new flagship programmes. The structural design is worth revisiting when your conversion rate drops measurably or when you add a new audience segment that the current page doesn’t speak to. Most well-built course homepages don’t need a structural redesign for two to three years; what they need is fresh proof and updated offers, refreshed every few months.
Build it yourself, or have it done
Designing a course website homepage that does all of this — clear offer, fast credibility, one action, the right visual weight in each section — is genuinely achievable on your own with the right platform. Maatos is built specifically for this: you get a fully branded course website with an LMS built in, so you’re not stitching together a homepage builder and a separate course platform and hoping they talk to each other. The homepage, the course catalogue, the enrolment flow, and the student dashboard all live in the same branded environment.
If you’d rather have it built properly from the start so you can focus on teaching, our done-for-you service handles the full build — homepage included. It’s the straightforward option when the design decisions feel like a distraction from the course itself.