


The checkout is the one part of your course business that isn’t allowed to feel janky. Someone finally decided your course is worth paying for, they’ve got their card out, and then… the currency looks wrong, an unexpected fee appears, or the payment just quietly fails. That hesitation is where sales go to die — and it’s almost always a setup problem, not a “people don’t want my course” problem.
For most course creators, Stripe is the tool doing the actual collecting. It’s popular for good reason: it handles cards, wallets, local payment methods and subscriptions across most of the world, and it’s built to work well with digital products like courses. Setting it up genuinely isn’t hard. But there’s a short list of mistakes that quietly cost people money, and they’re the same ones over and over.
So here’s the honest version — the seven that actually matter, whether you’re wiring Stripe up yourself or letting a platform do it for you. We’ll also cover the two questions everyone asks but the guides skip: what Stripe really costs, and whether you even need to touch any of this.
How connecting Stripe actually works (the short version)
Before the mistakes, the shape of the thing — because half the panic comes from not knowing how few steps there really are.
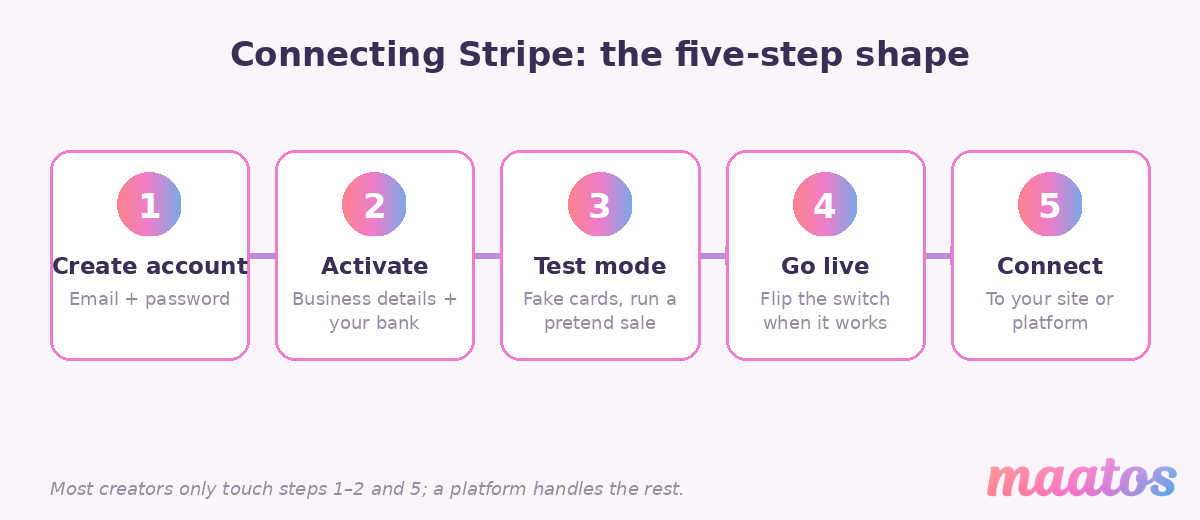
You create a Stripe account with your email, then activate it by adding your business details and a bank account (that’s where your money lands). Stripe starts you in a test mode — a sandbox with fake card numbers — so you can run a pretend purchase and watch it flow through before a single real euro is involved. Once you’re happy, you flip to live mode and connect Stripe to wherever your course lives: your own site, a plugin, or a course platform that has a “connect Stripe” button built in.
That last part is the fork in the road. If you’re building your own checkout, you’ll be copying API keys and wiring things together yourself. If you’re on a platform, you click connect, log in to Stripe, and you’re done — the platform handles the plumbing. Most of the mistakes below only bite the do-it-yourself route; a few catch everyone.
1. Mixing up test mode and live mode
This is the most common trip-up, and it goes both ways. People run real launches while still in test mode (so no actual money ever arrives, and they panic that “Stripe is broken”), or they test with live keys and rack up real charges on their own card during setup.
Stripe gives every account two sets of keys — one for test, one for live — and they are not interchangeable. Keep them straight, do all your experimenting in test mode with Stripe’s fake card numbers, and then, before you announce anything, run one real purchase in live mode with your own card and refund it. That five-minute check catches more problems than any amount of reading the docs.
Stripe even gives you fake card numbers for this — the famous 4242 4242 4242 4242 always succeeds, and there are numbers that deliberately fail so you can see what a declined payment looks like from the buyer’s side. Run a few, and watch each one appear in your Stripe dashboard so you know the money-in path really works end to end.
The other half of this is webhooks — the little message Stripe sends your site the instant a payment succeeds. That message is what tells your course to actually let the student in. If it’s missing or misconfigured, people pay and then stare at a screen that never grants them access, which is about the worst first impression you can make. If you’re on a platform, this is handled for you. If you’re doing it yourself, test that a successful test payment really does grant access, not just that the card was charged — a charge that goes through but doesn’t enrol the buyer is a refund and an apology waiting to happen.
2. Leaving tax and compliance until it bites
Two boring things here will save you a genuinely bad day later: card-data compliance and tax.
On the card side, the standard is PCI DSS, and the simplest way to comply is to never handle raw card numbers yourself. Use Stripe’s own Checkout or payment fields, which are already compliant, so the sensitive data goes straight to Stripe and never touches your server. Don’t store card details anywhere of your own. That one decision takes most of the compliance burden off your plate.
Tax is the part people genuinely forget. Depending on where you and your buyers are, you may need to charge VAT, GST or sales tax on a digital course — and the rules follow the buyer’s location, not yours. In the EU especially, selling a course to someone in another country can mean charging their country’s VAT from the first sale. It’s worth reading up on VAT on online courses in the European Union and, more generally, how to handle VAT and sales tax on digital courses before you flip to live mode. Stripe has a Stripe Tax add-on that calculates the right rate automatically at checkout, or a good course platform will do the VAT maths and send the invoice for you.
Why bother before you’ve sold anything? Because Stripe takes this seriously too:
If your integration doesn’t meet card-security or tax requirements, Stripe can hold your account, withhold funds, or in the worst case suspend you — which means no payouts until it’s sorted.
Getting it right up front is far less painful than untangling a frozen account with buyers waiting on access.
3. Only accepting one currency and one payment method
If your checkout only speaks US dollars and only takes a Visa, you’re quietly turning away a chunk of the world. Someone in Amsterdam who can’t pay with iDEAL, or someone in Berlin looking for a familiar option, will often just close the tab rather than fiddle with currency conversion.
Stripe supports far more than credit cards, and switching the extra methods on is mostly a matter of ticking boxes: digital wallets like Apple Pay and Google Pay, regional favourites like iDEAL, Bancontact and SEPA Direct Debit, and buy-now-pay-later options that lift conversion on higher-priced courses. It also supports charging people in their own currency, which removes that little moment of “wait, how much is that actually?” at the till.
You don’t need to enable everything on day one. Look at where your audience actually is, turn on the currencies and methods that match those countries, and price deliberately per market rather than letting raw exchange rates set odd numbers. Then test each one — a method that’s switched on but broken at checkout is worse than not offering it.
4. Having no plan for refunds and disputes
Refunds and chargebacks feel like edge cases right up until the first one lands, and then how you’ve set things up really matters.
Start with a refund policy that’s actually visible — on the sales page and at checkout, not buried in the footer. Say plainly when a refund applies (for example, within 14 days if the course hasn’t been substantially completed), how someone requests one, and what isn’t refundable. Clear terms prevent most of the “I want my money back” friction before it becomes a formal dispute.
A dispute (or chargeback) is different: that’s when a buyer goes to their bank instead of to you. Stripe handles these through its dashboard, and you get a limited window to respond with evidence — proof the student accessed the course, your terms, the email trail. Turn on dispute notifications so you don’t miss that window, and reply promptly and politely; a fast, evidenced response is what wins them. To have fewer in the first place, keep your course description honest about what’s included, answer payment questions quickly, and lean on Stripe’s fraud tools (more on those below) so dodgy transactions don’t get through to begin with.
5. Getting recurring billing wrong
Selling a course as a subscription or membership can smooth out your income beautifully — but recurring billing is where small misconfigurations turn into a support inbox full of angry emails.
Stripe’s recurring tools let you set the billing interval (monthly, quarterly, yearly), offer a free or discounted trial, and decide how cancellations behave — immediately, or at the end of the paid period. The classic mistakes are a trial that charges people too early (or never), and a cancellation flow that leaves someone unsure whether they still have access. Both erode trust fast.
The fix is unglamorous: decide your billing cycle, trial length and cancellation rule before you build, test the whole thing in sandbox mode so you can see exactly when the first charge fires, and state the terms in plain language where people sign up. If recurring revenue is central to your plan, it’s worth getting a second pair of eyes on the setup before you open the doors.
6. Skipping the security features Stripe gives you for free
Stripe hands you real fraud protection out of the box, and leaving it switched off is leaving money (and your account health) on the table.
The big one is 3D Secure — that extra “confirm it’s really you” step from the card issuer. In Europe it’s effectively required under the PSD2 / Strong Customer Authentication rules, and everywhere it cuts fraud and reduces the odd panicked chargeback from someone who forgot they bought your course. Stripe Radar adds machine-learning fraud screening that quietly blocks high-risk payments, and it’s on by default on the standard plan. Beyond that, treat your API keys like passwords: don’t paste them into public places, and rotate them if they ever leak.
None of this makes checkout harder for honest buyers — modern authentication is a tap on their phone — and it visibly signals that paying you is safe, which itself nudges more people to complete the purchase.
7. Hiding the real price until checkout
Nothing kills a sale faster than a number that changes at the last second. A course listed at €100 that suddenly becomes €121 with tax on the final screen doesn’t read as “ah, VAT” — it reads as a trick, and people bail.
Show the full price early. If tax applies, either build it into the displayed price or make it clear from the start, and give a clean itemised total (course, tax, any discount) rather than a scatter of separate line items people have to add up themselves. Update the total live as they pick a plan or add-on. Stripe Tax can calculate the right amount automatically so you’re not doing it by hand, and a platform that handles VAT will fold this in for you. If you want to go deeper on the mechanics of a checkout that converts, we’ve written about quick wins for your course checkout and the pricing models that actually convert.
So what does Stripe actually cost?
Here’s the question every setup guide skips: the fees. Stripe doesn’t charge a monthly fee on its standard plan — you pay per successful payment. As of July 2026, the headline rates look like this:
- United States: 2.9% + $0.30 per online card payment.
- Europe (EEA cards): lower, around 1.5% + €0.25 for standard European cards; the UK is roughly 1.5% + 20p for UK cards.
- International cards: add about 1.5% on top, plus around 1% if a currency conversion is involved.
- Add-ons: Stripe Tax is about 0.5% per transaction if you use it; a disputed payment carries a chargeback fee of roughly $15 (about €20).
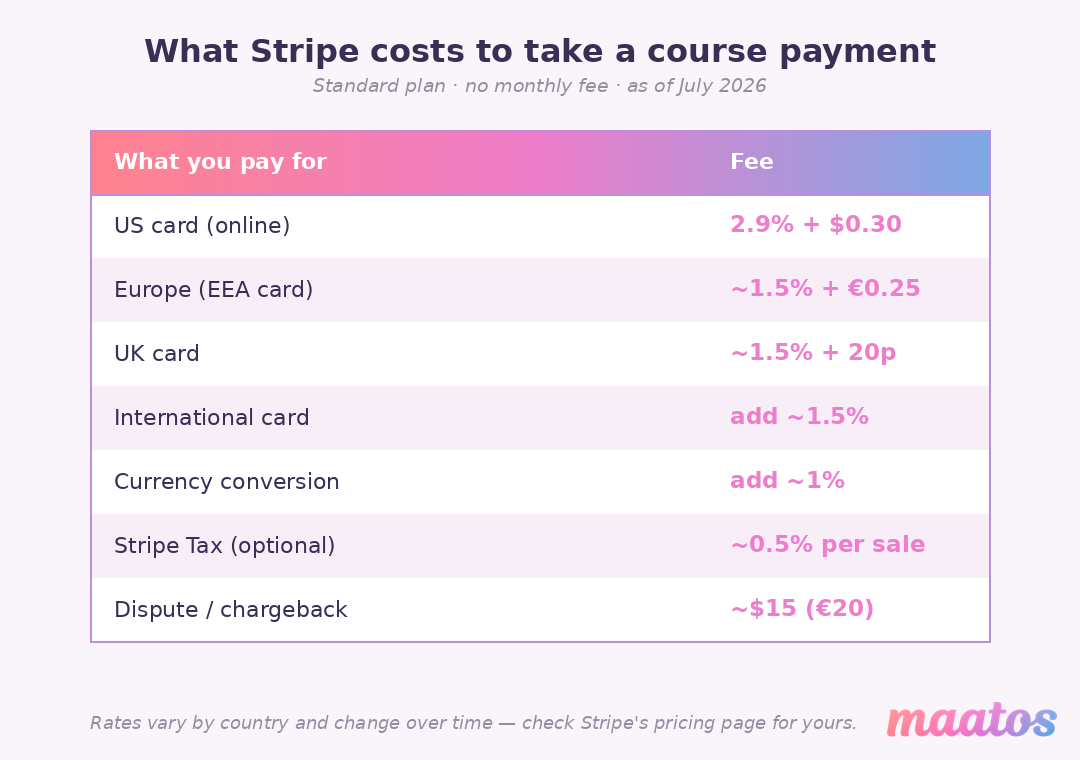
To make that concrete: on a month where you sell €2,000 of courses to European buyers, standard EEA card fees of roughly 1.5% + €0.25 work out to something like €30 plus a few euros per transaction — call it €40–€60 depending on how many separate sales that is. That’s the genuine cost of taking the money, and it’s the same whether you sell through your own site or a platform. What you want to avoid is a platform that adds its own cut on top of that, because that second layer is pure margin lost for doing nothing Stripe wasn’t already doing.
Rates vary by country and change over time, so check Stripe’s own pricing page for your region before you count on a number. Two practical notes people always ask about: your first payout typically takes a few days to a week while Stripe verifies you, after which money arrives on a rolling schedule (often every couple of days); and Stripe isn’t available in every country yet — if it isn’t in yours, Mollie is the common European alternative and covers a strong set of local methods.
Do you actually need to touch any of this?
Reading back through those seven, notice how many of them — test-versus-live keys, webhooks, PCI, dispute plumbing — are only your problem if you’re building the checkout yourself. That’s the real decision hiding inside “how do I set up Stripe”: do I want to be my own payments engineer, or do I want to just get paid?
Wiring Stripe up by hand gives you total control and is a fine choice if you’re technical or already deep in code. For most course creators, though, it’s a lot of fiddly responsibility sitting between you and your first sale. The alternative is a platform that connects Stripe for you and gets the boring bits right by default.
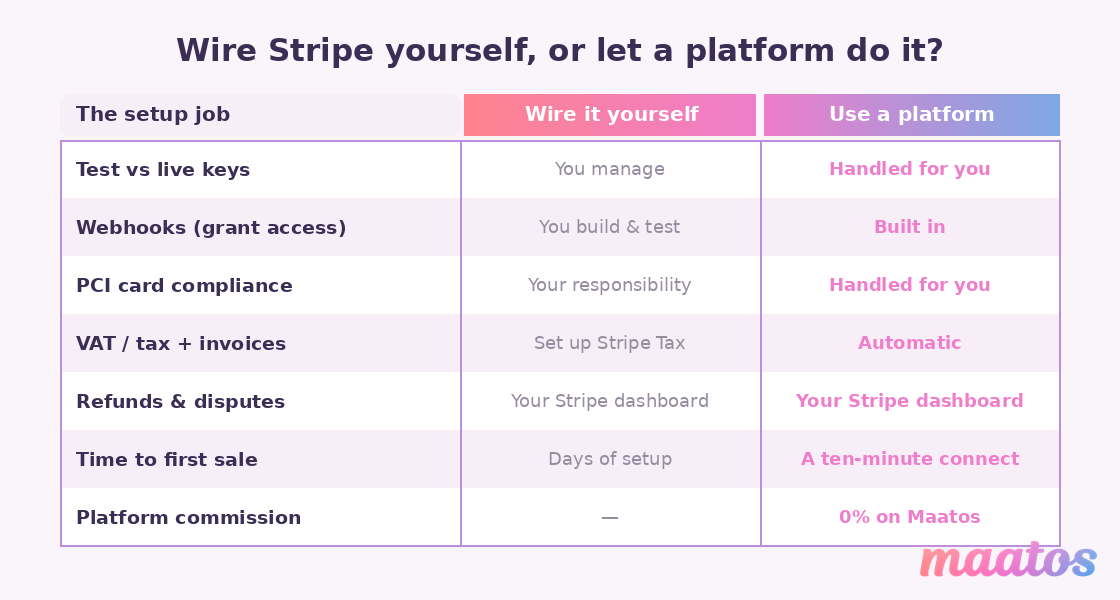
Think about how you’d rather spend the week before a launch. The do-it-yourself route has you reading webhook documentation, second-guessing whether your tax setup is right, and running test charges at midnight. The platform route has you recording one more lesson and writing your launch email, because the payment side was a ten-minute connect step days ago. Neither is wrong — but be honest about which job you actually want, because the checkout doesn’t care how it was built, only that it works.
That’s the lane Maatos sits in. You connect your own Stripe or Mollie account with a couple of clicks and get paid directly — the money goes straight to you, and Maatos takes 0% platform commission on your sales (you only ever pay Stripe or Mollie’s own transaction fees, the same ones above). Because it’s built for selling courses, the awkward parts come pre-sorted: your students can pay with cards, Apple Pay, Google Pay and the local methods common in their country, VAT is calculated automatically and invoices go out to your buyers without you lifting a finger, and the checkout shows a clean, honest total. Refunds and disputes still live in your Stripe or Mollie dashboard — that’s yours to manage — but the setup traps above mostly stop being things you have to think about.
If keeping every euro of your own sales is the point, that 0% commission is worth dwelling on; we’ve made the full case for it in why you should stop paying platform fees, and compared the trade-offs against a hosted option in Maatos vs Teachable. And if you’d rather not set any of it up at all, our done-for-you service will build the whole thing — payments included — and hand it over ready to sell. You’ll find more payment and platform guides in the building your course website hub.
Frequently asked questions
Is Stripe good for selling online courses?
Yes. Stripe is one of the most widely used payment processors for digital products, and it handles the things course sales need: cards and wallets, multiple currencies, local payment methods, subscriptions, and automatic tax calculation via Stripe Tax. The main thing to sort out is how it connects to your course — either through a platform that does it for you, or a bit of setup if you’re going it alone.
How much does Stripe charge for course payments?
On Stripe’s standard plan there’s no monthly fee; you pay per successful payment. As a rough guide for July 2026, that’s about 2.9% + $0.30 in the US, and lower for domestic European cards (around 1.5% + €0.25). International cards and currency conversion add a little more, and optional tools like Stripe Tax cost a small extra percentage. Always check Stripe’s pricing page for your country.
Do I need to be a developer to set up Stripe?
No — not if you use a course platform. On a platform, connecting Stripe is a click-and-log-in step, and the technical parts (keys, webhooks, security, tax) are handled for you. You only need developer-level setup if you’re building your own checkout from scratch.
Stripe or Mollie — which should a course business use?
Both are solid; the choice is mostly about where you and your buyers are. Stripe has the widest global reach and the biggest feature set. Mollie is popular in Europe and strong on local methods like iDEAL and Bancontact, and it’s the usual fallback in countries where Stripe isn’t available yet. A platform like Maatos supports both, so you can connect whichever fits.
How do I add VAT or sales tax to Stripe course payments?
You can switch on Stripe Tax, which works out the correct rate based on your buyer’s location and applies it at checkout, or use a course platform that calculates VAT and sends invoices automatically. Either way, the rate follows the buyer’s country, so check your obligations before you sell — see our guides on EU VAT on courses and handling VAT on digital courses.
When do I actually get my money?
Your first payout usually takes a few days to about a week while Stripe verifies your account. After that, payouts land on a rolling schedule — often every couple of days — straight into your connected bank account. You stay in control of your own cash flow rather than waiting on a platform to pass it along.
Is Stripe available in my country?
Stripe covers a large and growing list of countries, but not everywhere. If it’s not yet available where you are, Mollie is the common alternative in Europe, and a good course platform will let you connect whichever one works for you.
Can I use Stripe on my own website?
Yes. Stripe works with most website setups — a WordPress plugin, a website builder’s payment block, or a full custom checkout. The trade-off is how much you manage yourself: a plugin or a purpose-built course platform handles the keys, webhooks and tax for you, whereas a hand-built checkout puts all seven of the points above in your hands. Pick the level of control you actually want to be responsible for.
Get your payments right the first time
Taking payments for a course isn’t the scary part it’s made out to be — it’s a handful of decisions made once, carefully, so that the moment someone clicks “buy” just works. Sort out test-versus-live, tax, currencies, refunds and an honest price, and you’ve removed almost every reason a sale slips away at the last step.
If you’d rather skip the plumbing entirely and have all of that set up sensibly by default — your own Stripe or Mollie, 0% platform commission, VAT and invoices handled — start free with Maatos and have your checkout ready before your next launch.