
Nobody has ever written in to say a course video was a little soft-focus. Nobody notices your white balance. But put a fridge hum, a ring of room echo and a microphone sitting an arm’s length away behind an otherwise excellent lesson, and people quietly close the tab — usually without being able to tell you why.
That’s the whole argument here, and it’s worth settling before you spend anything on a camera: your students will forgive your picture and punish your sound. The reassuring part is that good audio is mostly free. It comes from which room you sit in, how close you are to the microphone, and what’s on the wall behind you — not from a shopping spree.
So this is what actually makes home recordings sound bad, what to buy if you buy anything at all, the settings worth getting right, and a twenty-minute pass you can run before you record your next lesson.
Why does audio matter more than video in an online course?
Because bad sound makes you seem less credible, and it makes your lesson harder to remember — neither of which is fair, and both of which are well documented.
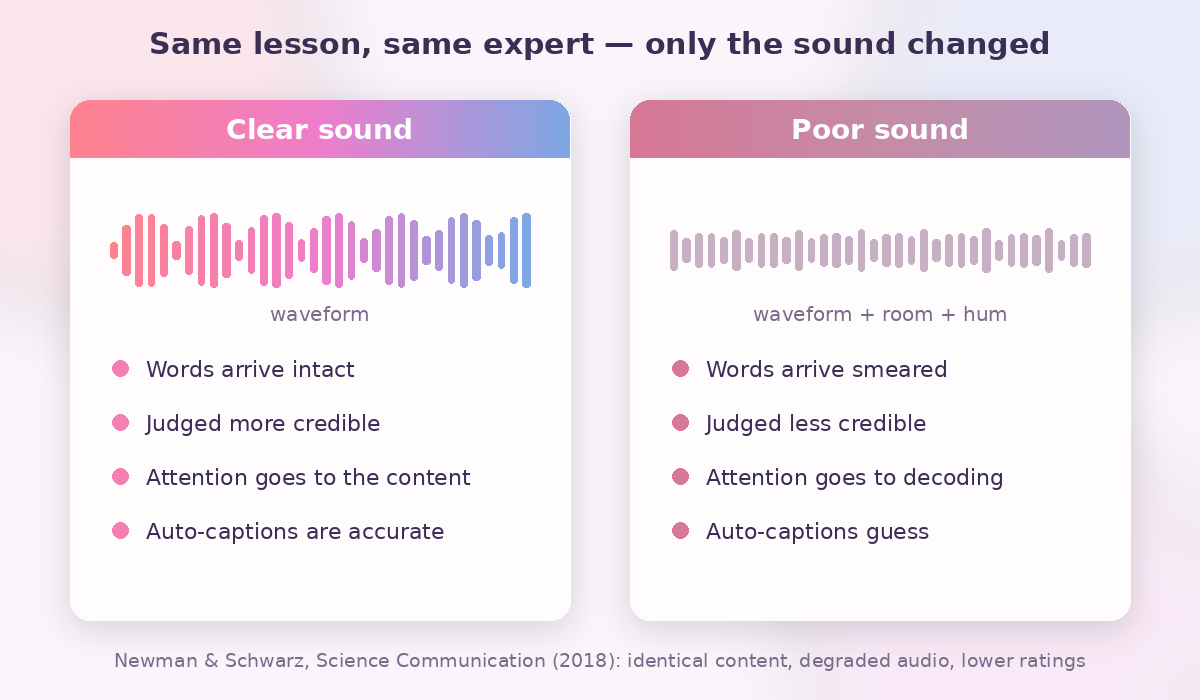
The clearest evidence comes from a 2018 study in Science Communication by Eryn Newman and Norbert Schwarz. They took recordings of real conference talks and radio interviews, changed nothing about the content, and simply degraded the audio quality on one version. People who heard the poorer recording rated the talk as worse, the speaker as less intelligent and less likeable, and the research itself as less important. Same words, same expert, same credentials on screen. Worse sound, worse verdict.
Then there’s the cost to learning. Hearing research on what’s called listening effort — summarised well in Jonathan Peelle’s 2018 review in Ear and Hearing — keeps finding the same thing: when speech is acoustically difficult, listeners burn cognitive resources decoding the words, and those are exactly the resources they needed for understanding and remembering the content. Your student isn’t lazy. They spent their attention on your fridge.
And remember where your course is actually consumed. Not in a quiet study with good headphones, but on a laptop speaker in a shared office, on a phone in a kitchen, on earbuds on a train. A recording that sounds “fine, a bit echoey” in your room is unusable in theirs. If people are dropping out partway through your lessons, sound is worth ruling out before you start rethinking your lesson length.
What actually makes a home recording sound bad?
Three things, and in this order: the room you’re in, the distance between your mouth and the microphone, and the noises you stopped noticing years ago.
The room comes first. Hard, parallel surfaces — bare walls, a tiled or wooden floor, a big window, a glass desk — bounce your voice around until each word arrives slightly smeared over the one before it. That’s reverb, and it’s the “recorded in a stairwell” sound. It matters more than your microphone because reverb is baked into the recording. No amount of editing genuinely removes it.
Try this before you read on. Stand where you’d record and clap once, hard. If you hear a short bright ring hanging in the air after the clap, that ring is going to sit underneath every sentence you speak.
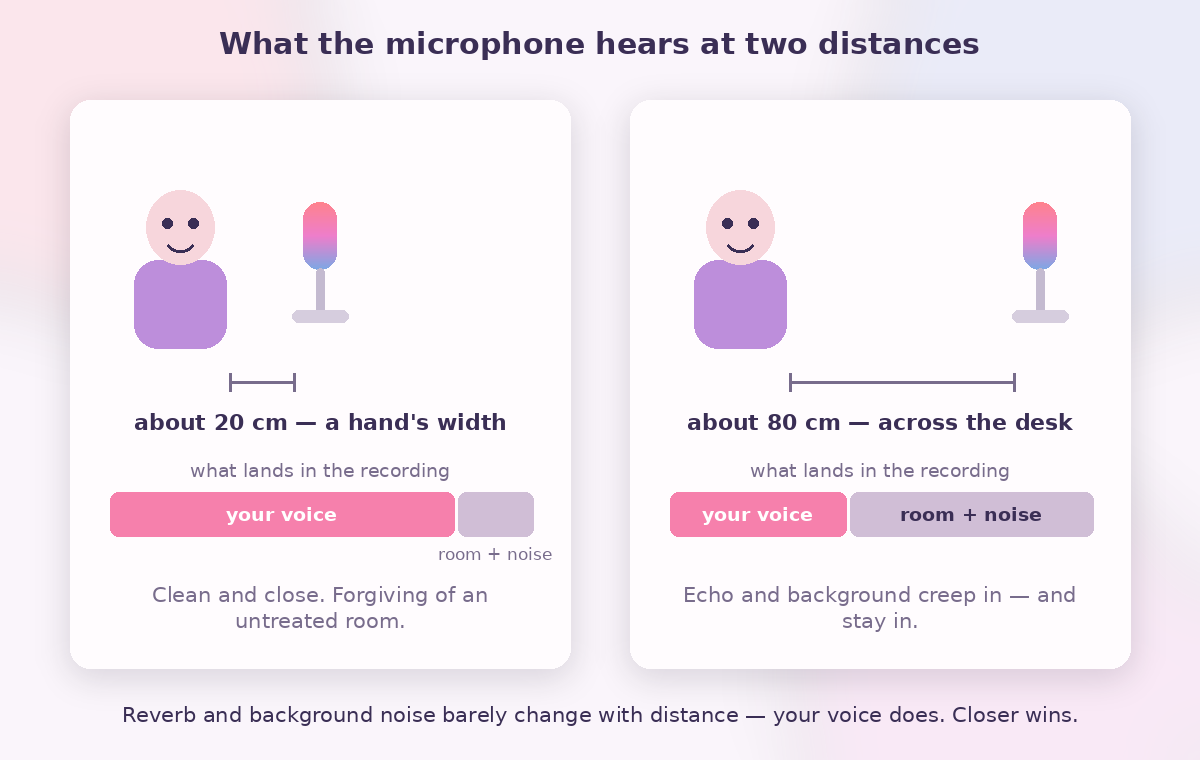
Distance comes second, and it’s the cheapest fix you have. Sound falls away fast with distance, but the room’s reverb and the traffic outside don’t — they’re roughly the same wherever you put the mic. So every centimetre you move away tips the balance further away from your voice and towards the room. A microphone a hand’s width from your mouth records mostly you. The same microphone across the desk records you and the room, in worrying proportions.
Constant noise comes third, and it’s the one you’re blind to. The fridge compressor, the ventilation, the laptop fan spinning up because it’s encoding video, the dehumidifier, the road. Your brain filters all of it out within about a minute. The microphone never will.
Do you need an expensive microphone?
No. A cheap microphone close to your mouth beats an expensive one across the desk, every single time — so if your budget is zero, you can still get to “sounds professional”.
Think of it as four rungs, and take the lowest one that solves your problem.
Your phone is the free option, and a better one than people expect. Modern phone microphones are decent, and more importantly the phone can be close to you. Record the audio on the phone tucked into a shirt pocket or clipped near your chest while you film with something else, then line the two tracks up in your editor. If that sounds fiddly, just film on the phone and stand close to it.
Wired earbuds with an inline microphone are the least glamorous upgrade in this article and one of the most effective. That little bump on the cable sits roughly 20 cm below your chin and it stays there, which means consistent level from take to take — the thing beginners struggle with most.
A clip-on lavalier is the workhorse for talking-head lessons, wired or one of the small wireless clip mics. Clip it about 15 to 20 cm below your chin, on the outside of your clothing, and route the cable so nothing brushes against it. Fabric rustle is the one flaw of this rung, and it’s entirely avoidable.
A USB microphone on a desk arm is where to spend if your course is mostly screen recordings, because then your voice is the only thing your students experience of you. One honest note on the choice most people get stuck on: condenser mics are more sensitive and pick up more of the room, which is lovely in a treated studio and merciless in a spare bedroom. A dynamic mic wants you within a hand’s width but ignores much more of what’s around you. In an untreated room, the dynamic is the more forgiving buy.
Whichever rung you land on, speak slightly across the microphone rather than straight into it. Your P’s and B’s push a puff of air that hits the capsule as a thump, and angling the mic a few degrees off your mouth removes most of it for free.
For everything else that goes into a lesson — framing, screen capture, editing — we’ve written a broader walkthrough on making your course videos.
How do you make an ordinary room sound better without buying panels?
Add soft things and get away from bare parallel surfaces. A room with a rug, curtains and a full bookshelf can sound as good as a small studio, and it costs nothing.
The counter-intuitive part is that smaller and more cluttered wins. A home office with a full wardrobe, a bed and a carpet is a better recording space than a big, beautiful, empty living room. Your enemy is reflection, and soft, irregular, non-parallel stuff eats reflections.
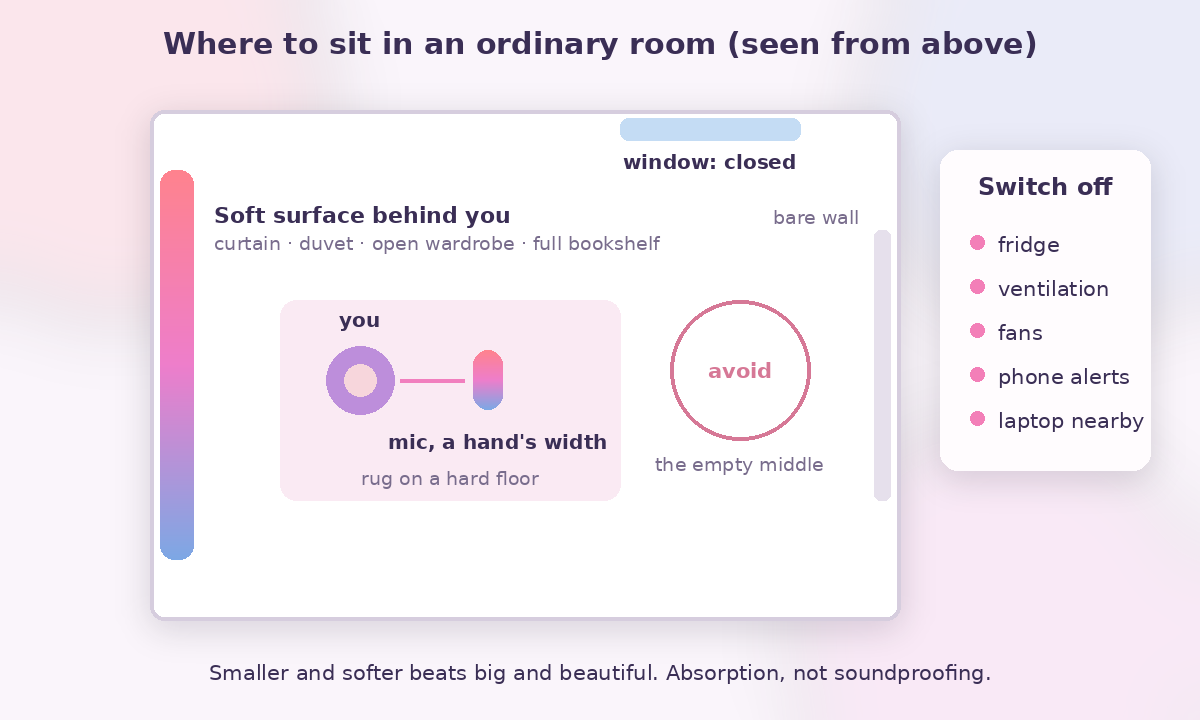
The one placement rule worth knowing: a normal cardioid microphone hears what’s in front of it, which means it’s mostly listening to the wall behind your head. So put the softness there. A curtain, a duvet over a clothes rail, an open wardrobe, a bookshelf with books at uneven depths — anything but a bare flat wall a metre behind you. Then get off the hard floor with a rug, and don’t sit in the exact middle of the room.
After that it’s just housekeeping, and it takes three minutes. Close the window. Switch off the ventilation and any fan. Unplug the fridge and put your keys on top of it so you actually remember to plug it back in. Put your phone in flight mode. If you’re recording to a laptop with a spinning fan, get the laptop further from the microphone than you are.
None of this is soundproofing, and you don’t want soundproofing — that’s structural, expensive, and it solves a different problem (keeping the neighbour’s drill out). What you want is absorption, and a duvet is absorption.
What recording settings should you actually use?
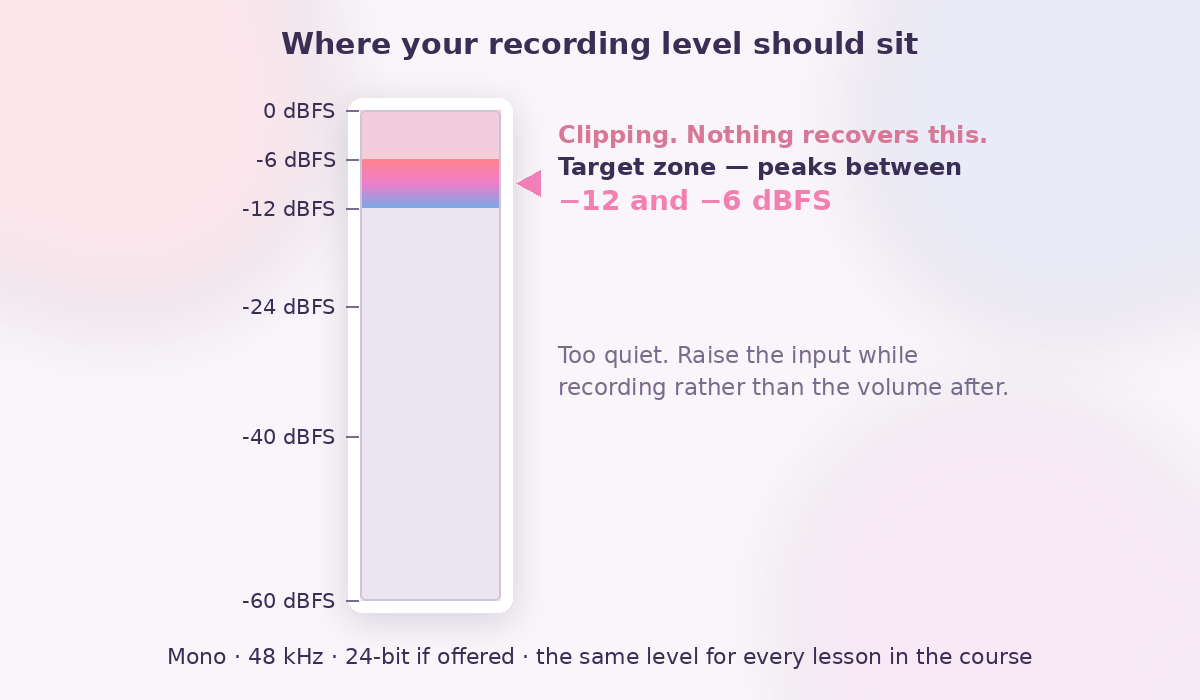
Aim for peaks around −12 to −6 dBFS, record in mono, and listen back on headphones before you commit to a whole course.
Level is the one that ruins recordings permanently. Speak at your real teaching volume — which is louder than your reading-the-settings-menu voice — and watch the meter. You want it living in the upper middle of the range, with the loudest moments hitting somewhere between −12 and −6 dBFS. Never let it touch 0. Clipping is the one audio problem with no fix at all; a slightly quiet recording can be raised later, a clipped one is simply broken.
Mono, not stereo. One person talking into one microphone is a mono source. Recording it in stereo doubles the file size and adds nothing.
48 kHz sample rate, and 24-bit if your recorder offers it. 48 kHz is the standard for video, and 24-bit gives you room to be a bit conservative with the level.
Headphones are non-negotiable, at some point in the process. Monitoring live is ideal. If you can’t, record twenty seconds, stop, and actually listen to it on headphones before recording the rest. That single habit is the difference between noticing a buzz now and discovering it in twelve finished lessons.
Two small habits that pay off later. Record ten seconds of silence at the start of each session — noise-reduction tools use that “room tone” as their sample of what to remove, and editors use it to patch gaps. And keep your setup identical across the course: same room, same distance, same input level. Students notice a volume jump between lessons far more than they notice a slightly different shirt.
What can you fix afterwards, and what can’t you?
Steady background noise, overall loudness and a bit of harshness are fixable. Room echo and clipping are not — which is exactly why the room and the level matter more than anything you do in an editor.
On the fixable side, free tools go a long way. Audacity’s noise reduction, fed with that ten seconds of room tone, will lift a constant hum out cleanly. DaVinci Resolve’s Fairlight page does the same inside a video edit. Loudness levellers of the Auphonic or Adobe Podcast type will even out a whole batch of lessons in one pass.
If you want a number to aim at: spoken-word audio is commonly mastered to around −16 LUFS integrated with true peaks kept at or below −1 dBTP, and the big platforms normalise towards roughly −14 LUFS anyway. Honestly though, for a course the important thing isn’t the exact target — it’s that every lesson sits at the same loudness so nobody is reaching for the volume slider between modules.
On the unfixable side: reverb is still, after years of clever software, mostly permanent. So is clipping. So is a microphone that was simply too far away. Ten seconds of listening before you record beats an afternoon of repair.
Should your course videos have captions?
Yes. Captions for prerecorded video are a Level A requirement under WCAG success criterion 1.2.2 — the baseline accessibility level, not the aspirational one — and a large share of your students will switch them on by choice even with perfect hearing.
The workflow that works is to auto-generate and then correct. Every automatic captioning tool will mangle your subject’s jargon, your product names and anybody’s surname, and those are precisely the words your students came for. Budget ten minutes per lesson to fix them.
Captions also quietly serve people watching with the sound off on a commute, people studying in a second language, and your own search visibility if you put the transcript on the lesson page. And there’s a neat loop back to the rest of this article: automatic captioning gets dramatically more accurate when the audio is clean. Fix the sound and the captions get easier too.
The twenty-minute audio pass before your next lesson
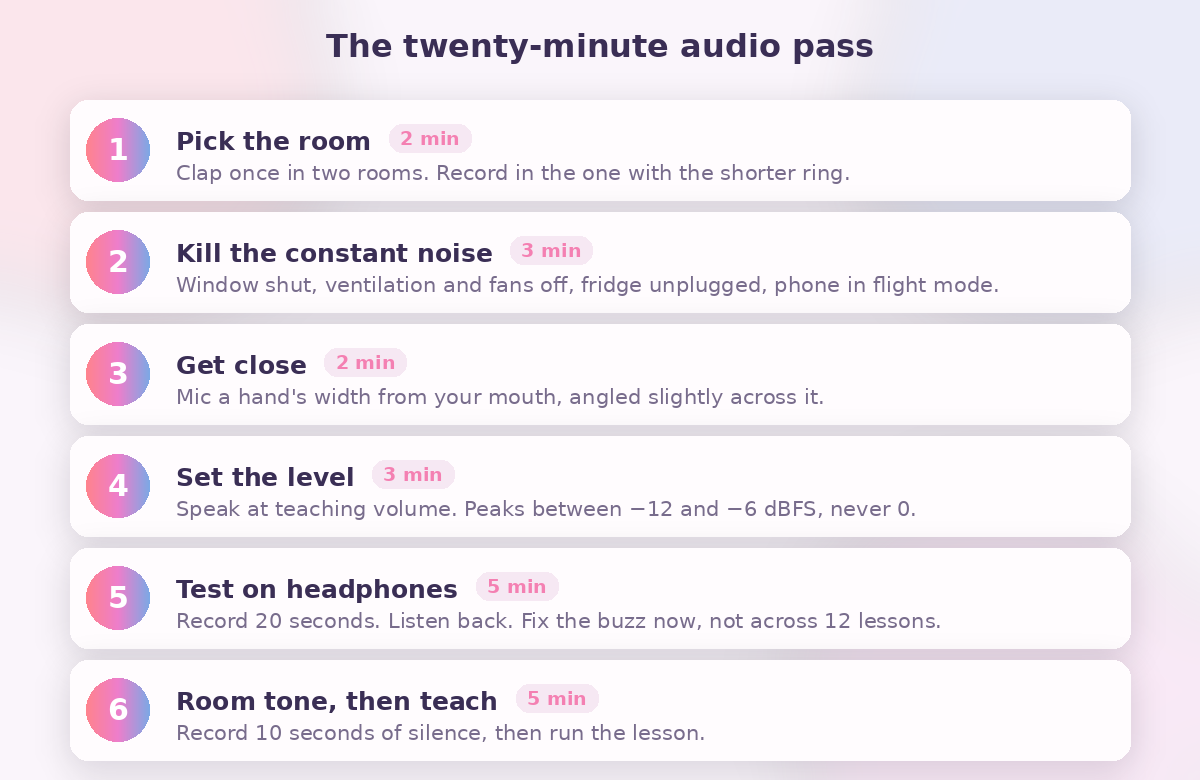
Here’s the whole article as something you can do this afternoon. Six steps, twenty minutes, no purchases.
- Pick the room (2 minutes). Clap once in two candidate rooms and record in the one with the shorter ring. Smaller and softer usually wins.
- Kill the constant noise (3 minutes). Window closed, ventilation and fans off, fridge unplugged with your keys on it, phone in flight mode, laptop moved away from the mic.
- Get close (2 minutes). Microphone a hand’s width from your mouth, angled slightly across it rather than straight at it. Softness on the wall behind your head.
- Set the level (3 minutes). Speak at teaching volume, peaks between −12 and −6 dBFS, never touching 0.
- Record twenty seconds and listen on headphones (5 minutes). This is the step people skip and the step that saves the day. Buzz? Rustle? Echo? Fix it now, not across twelve lessons.
- Record ten seconds of silence, then teach (5 minutes). Room tone first, then run the lesson.
If you’d like a rehearsal before the real take, running the lesson past one person first catches the content problems that no microphone can help with — we’ve written about practising your teaching before you publish, and if it’s a live session you’re preparing, the same principles apply to running your first webinar. And if the thing slowing you down is knowing what to say rather than how it sounds, our prompts for scripting course lessons will get you a first draft to react to.
Where do the finished lessons live?
Once the audio is clean, the remaining question is delivery — where the lesson sits, who can watch it, and how you get paid for it. That’s a platform decision rather than an audio one.
This is where we come in, and it’s worth being precise about what we do and don’t do. Maatos gives your course its own branded website: you upload video, audio, PDFs and attachments, build the lesson pages with a drag-and-drop editor, add quizzes and certificates, and take payments through your own Stripe or Mollie account with VAT and invoices handled automatically. You can see the full list on our features page.
What Maatos does not do is clean up your sound. There’s no noise removal, no automatic captioning, no audio repair — that all happens in your editor before you upload. Any platform that implies otherwise is overselling.
One genuinely useful consequence of the multimedia support, though: because Maatos plays audio files as well as video, a lesson that is really just you talking can ship as audio plus a PDF. Students who want to listen while walking or driving get a much better experience than they would from a video they can’t watch, and you skip an entire day of filming. Not every lesson needs a face.
If you’d rather not assemble any of this yourself, our done-for-you service builds the platform for you. And there’s plenty more on the making side over on the Creating Courses hub.
Frequently asked questions
What is the best microphone for online course videos?
There isn’t a single best one, and the question matters less than where you put it. Any microphone you can place within about 20 cm of your mouth, used in a room with soft surfaces, will beat a more expensive microphone placed further away. If you want a shape for the decision: a clip-on lavalier for talking-head lessons, a dynamic USB microphone for screen recordings.
Can I record course videos with just my phone?
Yes. Phone microphones are decent, and the phone is easy to get close to your mouth, which is the part that actually matters. Either record audio on the phone in a shirt pocket while filming with something else and sync the two in your editor, or film on the phone and stand close.
How do I get rid of echo in my course recordings?
You prevent it rather than remove it. Move to a smaller, softer room, get within a hand’s width of the microphone, and put something soft — a curtain, a duvet, an open wardrobe, a full bookshelf — on the wall behind your head. Reverb that’s already in a recording is effectively permanent.
Do I need soundproofing or acoustic foam?
Almost certainly not. Soundproofing is structural and expensive and solves a different problem: keeping outside noise out. What you need is absorption inside the room, and curtains, rugs, bookshelves and bedding do that for nothing.
What audio level should I record at?
Aim for peaks between −12 and −6 dBFS and never let the meter touch 0, because clipping cannot be repaired. Sort out final loudness afterwards — spoken word is commonly landed around −16 LUFS with true peaks at or below −1 dBTP — and above all keep every lesson at the same loudness as the others.
Do online course videos need captions?
Yes. WCAG lists captions for prerecorded video as a Level A requirement under success criterion 1.2.2, which is the accessibility baseline. Beyond compliance, plenty of students turn captions on by choice. Auto-generate them, then spend ten minutes correcting names and jargon.
My existing lessons sound bad. Do I re-record the whole course?
No. Re-record your first lesson, because it sets the expectation, and the single worst-sounding lesson, because it’s the one people complain about. Run a loudness pass over everything else so the volume is consistent. That gets you most of the benefit for a fraction of the work.
Your next twenty minutes
You don’t need a studio, a treated room or a microphone with a name people recognise. You need to sit somewhere soft, get close, watch the meter, and listen to twenty seconds on headphones before you record the other forty minutes. That’s it. That’s the whole upgrade, and it will do more for how your teaching lands than any camera you could buy this year.
When the lessons sound the way you want them to, give them somewhere that’s actually yours — your own branded course site, your own payments, your own students. Start your free 30-day trial and put the first one online.